Getting a Deep Mark With Your Pin Marker
Getting a deep mark with a pin marker is ideal for thick metals and marking materials that will undergo some form of post-processing. For example, let’s say you’re marking a part that will later be painted over. If your mark is too thin and/or too shallow, the paint may obscure the mark if not completely cover it up. You’ll want to make a deeper, thicker mark to avoid that.
Deep mark setting
So let’s go back to the three components of pin marking that we talked about previously: the stylus tip, force, and speed. For a deeper, wider mark, we’ll use:
- A stylus tip that that has a broad angle. At GT SCHMIDT, we call this our Heavy Duty stylus.
- A good amount of force. Start with whatever is recommended for your stylus. Ours will be set at 80 PSI.
- A mark speed of 1400 steps per second.
We’re going to test this on a steel plate. After making the deep mark with the Heavy Duty stylus, we’re going to make the same mark with our #1 stylus, which has a thin, high-angle tip. Before we demo these marks though, let’s take a quick look at these two different styluses.
Stylus comparison
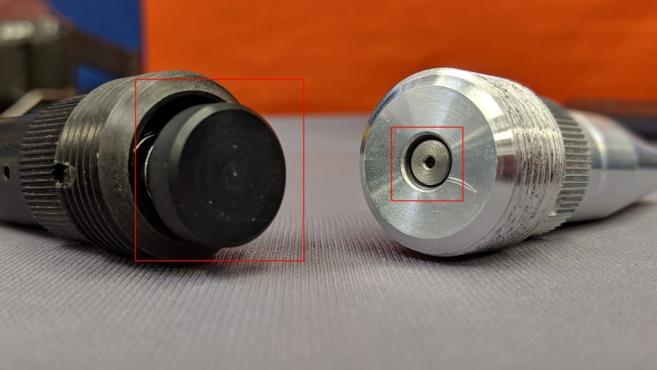
In this image, compare the size of each pin’s base. The base is the part of the pin that gets pushed down by air pressure while you’re marking. You’ll notice that the Heavy Duty stylus’s base on the left has a much bigger diameter. When air pressure is applied, a lot of force is generated because there’s a large surface area for the air pressure to push against.
On the other hand, the base of the #1 stylus is much smaller. When air pressure is applied, only some of it pushes against the base, effectively creating less force. So even though we’ll be running both styluses at the same PSI, the Heavy Duty stylus is actually going to generate more force than the #1 stylus.
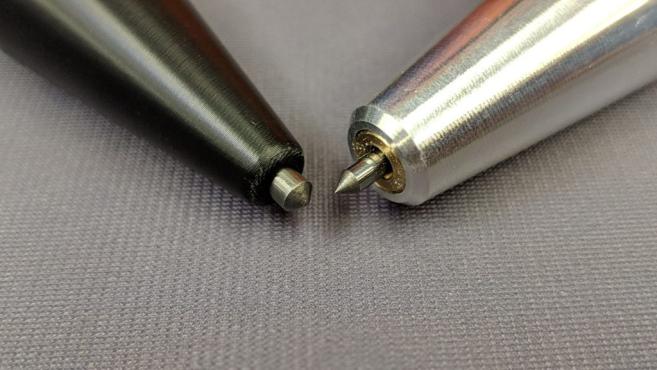
Next, here’s a comparison of the stylus tips. You can see that the tip of the #1 stylus on the right is thinner than the Heavy Duty stylus tip. As a result, the mark made with the #1 stylus will be thinner as well.
Deep mark demo
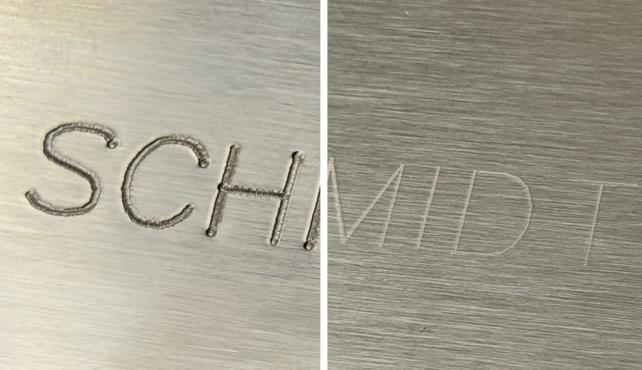
To the right are pictures of the two marks. The mark on the left was made by a Heavy Duty stylus and the settings listed above. The mark on the right was made by a #1 stylus. The Heavy Duty stylus clearly made a more visible mark. You can tell that not only is it wider due to the width of the tip but it’s also much deeper because it had a greater force behind it.
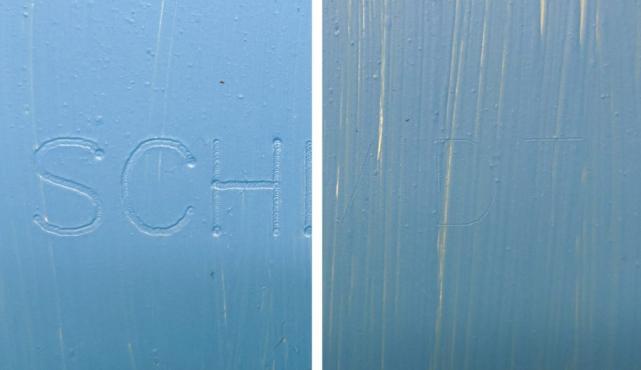
As mentioned before, deep marks are great if there’s going to be some kind of post processing on the part after marking. So we painted over the marks and as you can see, the mark made with the Heavy Duty stylus (left) is still visible. However, the second is very hard to see because it’s thinner and not as deep. In fact, some of the paint was removed from that mark and the image color was adjusted just to make the mark visible.
Learn More About The Marks You Can Make With A Pin Marking Machine
This was a very brief overview of the different marks you can make with a pin marker, how to achieve those marks, and the kind of applications you would use those marks for.
To learn more, give us a call or complete the form below to request more information.


